Part 2 - Handles and reel seats
Whipping checkThe whipping check (or winding check) is the little collar that sits on the front of the handle to finish the cork and give firm surface to finish the whipping against. Checks can be plastic or metal: aluminium or nickel silver - the usual rule is to match the reel seat. Winding checks come in a range of sizes, measure your blank or take advice from your supplier (if in doubt buy a slightly smaller size and ream it out to fit). |
 |
Whipping check
The whipping check (or winding check) is the little collar that sits on the front of the handle to finish the cork and give firm surface to finish the whipping against. Checks can be plastic or metal: aluminium or nickel silver - the usual rule is to match the reel seat. Winding checks come in a range of sizes, measure your blank or take advice from your supplier (if in doubt buy a slightly smaller size and ream it out to fit).
Handles
Most cork grips these days are pre-turned. The two common profiles are full- and half-wells. Full-wells is usually reserved for longer rods and for heavier lines. Had we been building a 9ft 6in #7 rod a full-wells grip would be more suitable. A reverse half-wells is generally recommended for shorter rods and for lighter lines.
Cork comes in a range of grades; flor grade (sometimes spelt ‘flour’ or even ‘flora’) is the best. Because cork is an organic material quality is seasonal. Buy the best you can, the price difference is small for a self-build.
Cork rings, or shives, are available but are not necessarily superior cork. If you decide to use shives you will require a wood-turning lathe and a lot of nerve to turn your own handle.
Pre-turned grips come with a standard untapered hole drilled through them; we will ream that out to fit.
If the reel seat is to be recessed into the handle, which gives the neatest fit, we must either use a lathe to cut the required recess into the rear of the grip, or buy a grip with the rebate already prepared.
Reel seat
We chose a top quality up-locking reel seat with a recessed rosewood spacer and nickel silver metal fittings - functional and handsome and is one of the higher priced seats (expect to pay anything from £5 to £35 for a reel seat). The hardwood spacer has been treated so that it will not swell if it gets wet.
Down-locking seats are rare on modern rods; they take the reel towards the very butt of the rod whereas an up-locking seat places it as close as possible to the caster’s hand.
If pure function is your preference, the Fuji reel seat is excellent and utterly reliable. If you expect to fish in saltwater an anodized aluminium or a Fuji reel seat will resist corrosion.
Modern reel seats should all comply with the agreed standard reel foot size. If you have a problem fitting a reel it is more often the reel that is non-standard.
Materials
- Epoxy glue
- Varnish (epoxy or rod building varnish)
- Nylon whipping thread
- Masking tape
Tools
- Craft knife or blades
- Rod turner
- Tape measure
- Slide gauge or dial caliper (optional)
- Tapered reamer
- Chinagraph pencil (optional)
- Brush ▪ Mixing cups
Materials
You’ll need epoxy glue to attach the tip ring and to fix the reel seat and handle in place. Epoxy glues come in fast, medium and slow setting: choose a glue that gives you working time. The cork handle must be fitted tightly and will take a few moments to position; remember - fast-setting glues give little or no margin for error.
Epoxy glue and epoxy varnish are very similar, but there are differences - so the makers tell me! Again, setting speed is crucial. You’ll be varnishing one section at a time, all the whipping if possible, and that takes time. Epoxy varnish ‘self-levels’ so it must have time to flow once applied. The varnish should be exactly the same consistency for the last tying as it was for the first; otherwise the finish will suffer.
Epoxy varnish for rod building comes in two forms - thick and thin – high or low build. High-build varnish is thicker and gives a thicker coating - low-build is thinner and creates a thinner coat.
Because this is a custom-build I suggest using a low-build varnish (eg FlexCoat Lite). Epoxy varnish adds weight; low-build keeps it to a minimum. A thick coat of high-build varnish can sag; low-build is runnier but, simply, because you apply less, sagging is less apparent.
Whipping thread is almost always nylon now - like tying thread but thicker, always twisted, never waxed and very smooth. Choose a good brand such as Gudebrod or Fish Hawk.
Masking tape is used to hold rings in place. If you opt for a Fuji reel seat you will need masking tape to build up the thickness of the blank and get a tight fit before cementing into place.
Tools
To make neat, clean whippings you need fresh sharp blades: craft knife blades or utility razor blades are sharp enough when new.
Your rod must be rotated while the self-levelling rod varnish is settling. A rod turner makes the job easier.
You can turn section by hand until the varnish has set but inexpensive epoxy turners/rod turners are available.
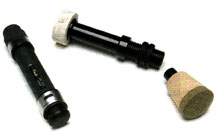
The only other essential is a tapered reamer - a very simple but very cunning tool. A tapered rod wrapped with a spiral of coarse sandpaper. A reamer allows you to open and shape the bore in both the cork handle and the wooden spacer if your reel seat has one.