Part 3 - Putting the pieces together
When you get all the parts for your new rod the temptation is to charge straight in and start whipping and gluing - don't!
Work out how the pieces fit together: the reel seat must fit exactly; the handle should fit tightly; the reel seat and the tip ring should line up; and of coarse all the rings in between must be in line. A little caution and extra time at this stage will lead to a much better rod.
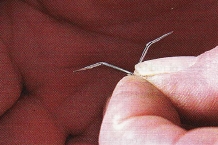
As this is a four-piece rod, my first job is to decide how to align the sections. If you read books or look at some of the rod-building websites, you'll find discussion about the spine (or spline) of a rod. The idea is that when the carbon cloth is wrapped there is a slight overlap, that means the blank will be a little stiffer down one side. Whether or not the spine is important is open to argument.
To find the spine, put the wider end of a tip section on the floor and press straight down on the tip, the section should spring into the curve it wants to take, ie 'the preferred plane of bending'. If you use the spine method your rings should normally be whipped on the inside of the curve.
I don't often use that method and neither do some top rod companies (eg Sage).
On a four-piece rod finding the preferred bend is easy for the tip section, difficult for the second and all but impossible for the lower two. A good modern blank has very little spine indeed; however, if you look really carefully when you fit the sections together even the best blanks are not perfectly straight. If you use the spine method there's no guarantee that the finished rod will be dead straight. I prefer to straighten the rod as much as possible during the build. Quite often the sections have a slight natural curve: I try to line those up so when the rod is complete it's as straight as possible.

I start with the top two sections sighting along the blank to make sure the whole rod will be as straight as possible.

I wrap pieces of masking tape either side of all three joints and mark the alignment I want.

The tip ring must be fitted in line with the mark at the joint.
Intermediate Rings
Modern rings are very well made and nearly ready to use. With a grinding wheel or a little elbow grease and a piece of sandpaper or a sharpening stone they can be perfect.
Rings should fit flush to the blank. If they are way out I'll bend them gently and coax them flat. Where they make contact with the blank they must be as smooth as possible so I grind them smooth if I must. Where the foot of the ring meets the blank there is a slight shoulder. When you come to whipping them in place you'll discover how important it is that the slope is shallow and smooth. I always grind them smooth.

Grinding the shoulder of a snake.
A prepared ring - the feet are dead flat and the shoulders ground smooth.
Ring positions
When the rings are prepared I tape them in place ready for whipping.
The reel seat and handle
I've chosen a reel seat which must be recessed into the back of the cork grip. With a plain handle the first job is to put the cork into a lathe and turn a rebate. If you opt for a prepared handle ensure that the seat and handle fit together neatly.

Lathe turned rebate for the reel seat.

Fitting the reel seat into the handle.
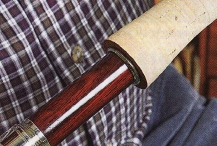
The fit should be snug but need not be too tight.
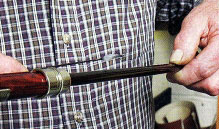
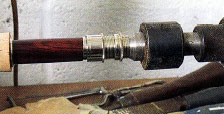
Fitting the reel seat to the blank
 |
 |
|---|
This seat has a wooden spacer and the hole through the centre is parallel so it can't slide all the way to the butt of the section (A). The first job is to carefully ream out the spacer (B) so the seat slides to the end of the rod. Note the butt cap of the seat has been removed. You have aligned your sections so you know which way the reels should be facing, make sure it faces that way before you try to glue it in place.

The surface of the blank is smooth and probably a little oily where you've handled it. Keying the surface of the blank by scratching it (here, with a hacksaw blade) ensures it is solidly cemented in place.

Prepare epoxy glue and smear onto the length of the blank where the seat will sit. Slide the seat into place. The blank should sit flush with the end of the spacer. Carefully wipe off any excess glue before it sets. Let the glue fully set before fixing the handle in place.
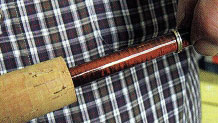
Fitting the handle
The centre of the handle must also be widened and tapered so it fits the blank. However, the handle must fit tightly and cork is slightly elastic. You should look to ream the centre so that the handle fits snug at about three inches from the reel seat. When you come to glue it in place the fit will be tight and the glue acts as lubricant as you push the handle into place.

Measure where the handle will end when it's fitted. When you spread varnish on the blank take care: you only want glue where it will be covered by cork.
You can see my thumb marking the front of the handle as I spread epoxy glue on the blank. Use a thin even coat. If possible you don't want excess glue oozing onto the reel seat. When the glue is ready slide the handle down the blank. Put the butt on the floor and use both hands to push the cork down into place. It should fit over the front of the reel seat.
TIP: If you get a little too eager when as you open out the holes in the centre of the reel seat and the handle so that they fit loosely - wrap the blank with masking tape so you get a tight fit.
In fact if you decide to fit a Fuji reel seat that's exactly how you do it: wrap tape around the blank where the seat will sit until you get a snug fit and epoxy it in place.
Once the handle is completely dry and fixed in place and before I fit the butt cap, I usually put the butt section into my lathe so I can turn down the sharp corners and slim the handle down a little. This is not essential but it's one of the differences between a custom-build and a factory-made rod.
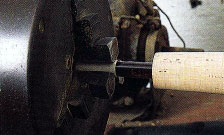
Masking tape protects the blank from the chuck.
A conical centre fits in to the butt.

Sandpaper is all you need to turn cork.

With the seat and handle in place you can glue the butt cap in place.
Fitting the winding check
The winding check finishes the handle. The check is a slim ring that sits on the front of the cork handle. You may well find that there is a slight gap between the cork and the blank where you've opened the hole a touch too much - the check takes care of that. When I'm building I usually match the check to the metal fittings on the reel seat.
This one is a little too small. I can either get a larger size or use a fine round file to open it slightly. The winding check should fit snug to the front of the handle. Be careful fitting a metal check, try not to scratch the blank as you fit it for size.