- Rod Guides& Tips
-
RodBlanks
Rod Blanks
GuidesnBlanks carries one of the biggest selections of freshwater, fly & saltwater Rod Blanks from MHX, Harrison, CTS, Evoke, Sage, St Croix and many more!
-
ReelSeats
Reel Seats
One of the UKs biggest selection of Reel Seats. We have a great range from all the top manufacturers, including Fuji, Alps, PacBay, REC and many more! Please have a browse.
Reel Seats
-
HandleComponents
Handle Components
We are one of the largest suppliers of custom rod building components in the UK, including handles, grips, rod guides and reel seats from the industry's top brand names. Suitable for all price ranges and skill levels,
-
Rod Finishes, glues, threads& decoration
Rod Finishes, glues, threads & decoration
GuidesnBlanks carries the largest selection of the brand name supplies you will need including epoxy & finishes, equipment, tools, and accessories. Browse around and shop the largest selection available online!
Threads
Decals & Decoration
-
Equipment& Tools
Equipment & Tools
Whether you are building a Fly, Game, Carp, Spinning, Boat, Beach, or Match rod from scratch or just making a simple rod repair or refurbishment Guides n Blanks has the equipment and tools you need!
Rod Building Equipment & Tools
-
Consumables& Guide sets
Consumables & Guide sets
No matter what form of fishing you prefer, we can help you get the right rod building consumables you need to help build your perfect rod!
Rod Building Consumables
Kits
-
Sundries-vouchersbags, tubes
Sundries-vouchers bags, tubes
Guides n Blanks are your top supplier for all fishing sundries you need, including gear, storage, tackle and apparel.
-
AquasealWaterproof
Aquaseal Waterproof
All you'll need for the care and feeding of your rugged outdoor wear.
Aquaseal Waterproofing
- Brands
Trade Orders Only
For retail orders please visit www.guidesnblanks.com
Butt Assembly
A step-by-step guide to Butt Assembly
 |
|
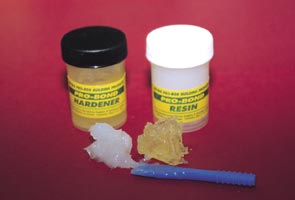
Mix two equal parts of ProBond Resin and Hardener to form an even mix. This is what your mix should look like, always mix enough to make sure you don’t run out halfway through. |
 |
|
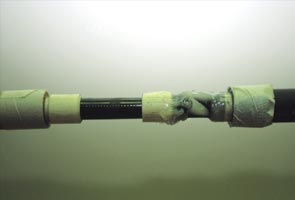
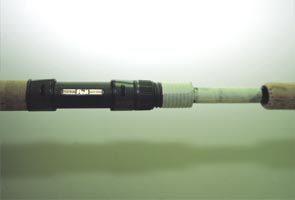
Apply the adhesive liberally to the Rod Blank, being careful to tape up Cork Grip and Tube Fitting to stop contamination. Then start to slowly turn your Reel Fitting into position.To ensure a reel fitting has a tight fit onto the blank, build up the blank with masking tape. |
 |
|
When you get halfway, spread more of your resin mix onto the rod, carrying on twisting the fitting into position. |
 |
|
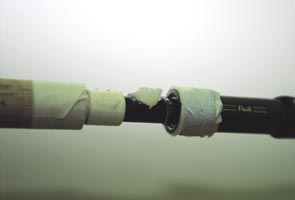
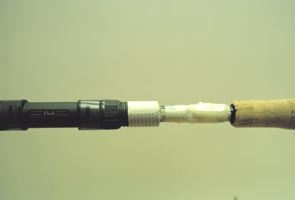
Just before you get to the end, clean out any build-up of resin mixture, to prevent spoiling on the Cork Grip as you twist the Reel Fitting into its final position. |
 |
|
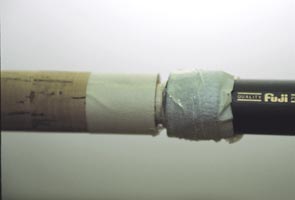
Fitting the Cork Handle is done in the same way as fitting the Reel Seat. Tape the blank with masking tape until you have a snug fit, not too tight or too loose. |
 |
|
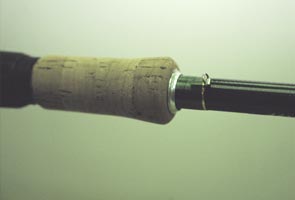
Spread resin onto tape, ensuring complete coverage all the way round and place some inside the Cork. Twist on and push into position. |
 |
|
Finish off with a neat shiny winding check to make the end product so much better. Whilst doing this you can whip on a Hook Keeper to complete a first class end section. |
 |
|
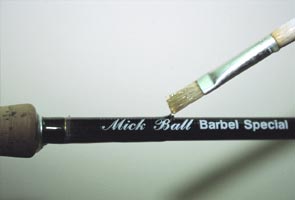
Place on your transfer or signwrite your name with white enamel paint. Mix a good amount of ProBuild gloss finish and using a stiff brush spread evenly along the length of the graphics to give a durable finish. |
 |
|
This is a selection of all the items you will need to build and finish your own custom built fishing rod. And all supplied by Hopkins & Holloway. |